NetSetMan
Helpfile

English English

Helpfile Version
2.4
Last Modified
01.11.2007
Operating Systems
Windows XP, Windows 2000, Windows 2003, Windows Vista
License
Non-Commercial Freeware
or
Commercial Pro Version
Languages
Bulgarian / Български,
Chinese / 汉语,
Czech / Český,
Danish / Dansk,
Dutch / Nederlands,
English,
French / Français,
German / Deutsch,
Hungarian / Magyar,
Italian / Italiano,
Polish / Polski,
Portuguese (PT) / Português,
Portuguese (BR) / Português,
Russian / Рускй,
Spanish / Español,
Swedish / Svenska,
Turkish / Türkçe,
Vietnamese / Tiếng Việt
Contact


NetSetMan: Non-Commercial Freeware
NetSetMan Main Window

NetSetMan Pro: Commercial Pro Version
NetSetMan Pro Main Window

Short Description

NetSetMan is a network settings manager which can easily switch between 6 different, visually structured profiles including:

  • IP Address
  • Subnet Mask
  • Default Gateway
  • DNS Server
  • Computer Name
  • Workgroup
  • DNS Domain
  • WINS Server
  • Default Printer
  • Network Drives
  • Scripts (BAT, VS, JS, ...)
Additionally only in the Pro version:
  • Can be used at work
  • Unlimited amount of profiles
  • Network-Domain
  • Complete Proxy Settings
    (Windows/Internet Explorer & Firefox)
  • Browser Home Page
    (Internet Explorer & Firefox)

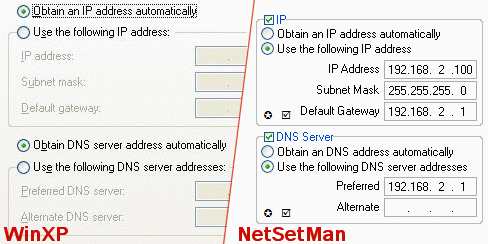
It is not only useful and effective but also easy and intuitive to handle. The entry fields remind of the Windows "Internet Protocol (TCP/IP) Properties" but it's much easier to fill in the addresses. Additionally lots of other network relevant settings can be managed.

All settings and changes are saved automatically in a separate file (settings.ini) so a backup, transfer or upgrade to another version is absolutely no problem.

Example Of Use

You need different IP settings for:
1. at home: 192.168.0.1, 255.255.255.0, no gateway
2. school: obtain everything automatically, Workgroup: School
3. at friends: 192.168.0.55, 255.255.255.0, gateway: 192.168.0.1, Workgroup: LAN, Computer Name: Nick
4. job: 10.10.1.40, 255.0.0.0, gateway: 10.10.1.1, Domain: youroffice.com (with username and password)

All settings are for one network card and so they have to be changed daily.

Manually: nerve-racking, with NetSetMan: only 2 clicks!

Familiar Look
Instructions

Profiles

The tabs symbolize the available profiles.
You can save 6 different sets of settings in those tabs.

All changes are saved automatically so nothing gets lost by mistake.

You can rename a profile by right clicking it and choosing "Rename" or simply double-click it.

Profile Tabs

Rename a Profile

Connections

All available network connections are defined by their name and their type.

To edit one of those connections you have to load all available connection names into the dropdown list by clicking "Refresh" and finally choosing a network adapter.
If you copy the ini file to another computer the adaptername will be shown as "[?]" because the unique adapter ID will not match on the other pc. You'll then have to refresh the available connections again.

Refresh Button
Get Settings

To load a current setting from the chosen profile just click on the symbol besides the entry field.
To get all current settings (that have a Get Settings Icon symbol) right-click the profile and chose "Get all current settings".

Get one Setting

Get all Settings

Clear Settings

If you just want to clear a specific address you can do this easily by double-clicking its caption.
To clear all settings of the current tab you have to choose the tab, then right-click on its caption and click "Clear Entries".

Clear one Setting

Clear all Settings

Favorites

There are some features that will help you to enter your values:
By clicking in an entry field its content will be selected so you can enter a new value right away.
If you enter 3 digits or press [tab], [ , ] or [ . ] on your keyboard the next address field is marked so you can continue typing in the address without losing any time or using your mouse.

You can click on the little star to fill in your favorite values.
To define favorite values you have to choose the tab, then right-click on its caption and click "Save as Favorite".

Save and load predefined Settings Save and load predefined Settings
Additional Addresses

You can specify more than one IP, Gateway, DNS and WINS address if you need to be in several networks at the same time. To do so click the "+" symbol. In the following windows you can set up an unlimited amount of addresses.
Enter your values in the entry fields at the top and click the [ v ] button to add the address to the list.
You can rearange the order by drag-and-drop.
Delete an entry by highlighting it and clicking the red [ x ] button.
Double-click an entry to fill its address value into the entry fields.
Whereas clicking the Get Settings Icon symbol in the main window only reads the first value, here it reads all assigned addresses.

Open Additional Addresses Window
Additional Addresses Window

Scripts

NetSetMan offers you a comforable way to manage your script files. However it has no own script language. This means you can only use scripting languages your OS can execute. Common scripting languages are VBS, JS and even a simple DOS Batch file. Use your favorite search engine to find more information about scripting and what you can do with it.
Open an existing script file or create a new one to be able to edit the script.
You can have two scripts that will be executed before and after all other settings are changed.
If you need a delay between running the script and changing the network settings you can specify it at the bottom.

Scripts Window

Map Network Drives

With NetSetMan you can map and disconnect an unlimited amount of network drives.
The entry fields are self-explaining. Please read the instruction notes at the bottom of the window by clicking "[Show Help]".

Network Drives Window

Activate Settings

To apply all settings of the current profile you have to click on "Activate".
Notice that only settings with a checked checkbox will be activated.

A new small window will pop up. It contains information about the current activation state.
There you can see which settings are applied at the moment and whether it was successful or not.
You can cancel the activation process by clicking the "Cancel"-button. Settings below the current point won't be set then.

Notice that even if you get an "OK" as a result it might be the best to reboot the pc or wait a while so changes can be synchronized in the network. (especially "PC Name" and "Workgroup/Domain")

If all results are green: good :-)
If not: Well, then you have to read the error message and try to solve the problem.
Click on the "+" at the bottom of the window to get a detailed log.

Check Mark

Activating Window

Here are the common results and their meanings:
empty
This setting was not marked to be changed. (empty checkbox)
OK
fine :-)
OK. Reboot
Computer has to be rebooted.
...
Settings are currently applied.
-
Settings were ignored without trying, because they were incomplete or erroneous
Errors
In most cases errors are shown as a red, short and clear text like "Wrong password".
Access denied
You probably don't have the required user rights to change this settings.
invalid
Either a value is not valid, not specified or not allowed. (special characters, same workgroup as computer name, etc.)
FF is active
Firefox is currently running. To apply FF settings you have to close Firefox.
Error: 95/96
"Unable to notify DNS service."
Please have a look at your Services dialog (type "services.msc" in the "run" window). Find "DNS-Client" and make sure it is set to "Automatically".
Error: XX
If you get an error with an error code and you absolutely have no idea what could be wrong please post the error code in the support forum.
Program Settings: Info, Language & Startup

If you click on the "Info"-Button a small window will pop up. There you will find some information about the program, links to the help file, relevant websites, etc.

Here you also can change some program settings:

  • Program language
  • Start up automatically with Windows (this will create a registry-key in "HKEY_CURRENT_USER\Software\Microsoft\Windows\CurrentVersion\Run")
  • Close the activation dialog automatically if no errors occured.
  • What should happen if you click on the [x] (Windows close button)? Exit or minimize NSM?
  • The Admin Mode dialog will be shown at the start of NSM if the program needs higher privileges. If you don't want the dialog to appear anymore you can deactivate it here.
Info Window
NetSetMan in Tray

By minimizing NetSetMan it will appear in the tray bar (beside the clock).
There you can simply activate a profile. Just right-click the icon and choose the profile to set.
To avoid setting a wrong profile you have to activate the profile to be clickable in tray. To do this select the profile, right-click on the tab and click "Active in Tray". The small symbol besides the text shows that this profile will be clickable in tray. To deactivate it simply click "Active in Tray" again and it will disappear.

Tray Icon Active in Tray
Command Line Activation

In some special cases you might want to change your profile without using the GUI of NetSetMan. (If you want to include it on a Boot-CD, add it to auto run, change profiles with shortcuts, etc.)

-a # : Activates the profile with the number #
-as # : Activates the profile in silent mode (Activating window will close automatically if no errors occured)
-h : starts NetSetMan minimized

A shortcut for activating profile # 0 in silent mode could look like this:
C:\NetSetMan\netsetman.exe -as 0
Shortcut

In DOS (command line):
Command Line

Admin-Mode

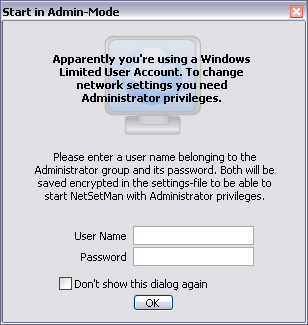
If you're working with a limited user account NetSetMan usually won't work properly. However you have the possibility to enter a user name and a password of an account with Administrator provileges which will be saved encrypted in the settings-file so NetSetMan can use them to start itself with the required privileges.
If you think that dialog appears by mistake and you don't want to see it at every start just check the checkbox. You can always change this setting in the "Info" dialog.

Admin Mode Window
Non-Commercial Freeware notification

This message in the main window will appear at every 7th start of the program, on average. So this will be one time per week if you use it every day.
I'm sorry I have to do this but most of the users didn't pay attention to the appeal not to use it at work. (whether they knew it or not).
This message is not included in the Pro verion, of course.

Non-Commercial Freeware Message

Additionally in NetSetMan Pro

Profile Categories

With NetSetMan Pro you are able to create an unlimited amount of profile categories.
Each category can contain up to 6 profiles.

In the profile categories bar at the top of the window you can change the category you want to view and also edit categories. The 3 circle-signs are for adding, deleting and renaming categories.
The list at the right opens the profile categories editor where you can organize your categories very easily.
You can rearrange the order by just dragging a category in the right position.

If you have more than one category your profiles will be shown grouped in the tray menu.

Profile Categories Bar

Profile Categories Window Tray Icon in Pro Version


Browser / Proxy

Click on the [...]-button to configure browser settings.
This works both with Internet Explorer and Firefox.
Your available Browsers will be shown in the browser field. Because Firefox supports several profiles every Firefox entry is shown with its profile name in brackets.
The rest should be self-explaining because it's quite similar to your browser.

If you haven't entered any browser settings you will see "(...)" in the main windows otherwise the chosen browser (IE = Internet Explorer, FF = Firefox) and the HTTP-proxy will be visible between "Browser" and the "C".

Please notice that Firefox must be closed before applying new settings.

Browser Overview

Browser Window

Domain

To join a domain enter its name, your user name and your password. To enter your password click on the "P"-button. Now you can type in your password which will be saved encrypted in the ini-file. Neither you nor anybody else will be able to read it.

Usually it's enough to enter the pure user name.
If you get an error you can try entering one of the two following standards as your user name:
1. NETBIOS: DOMAIN\user
2. UPN: user@domain.com
Ask your administrator if you are not sure.

Check the FAQ to read some notes for this feature.

Domain Overview

Criticism / Praise / Inspirations / Bug Reports (Program, Helpfile)

Please use the support forum.
For special questions or if you'd like to translate NetSetMan into another language you can write an email.